33 Coupe Interior 66
2/20/05
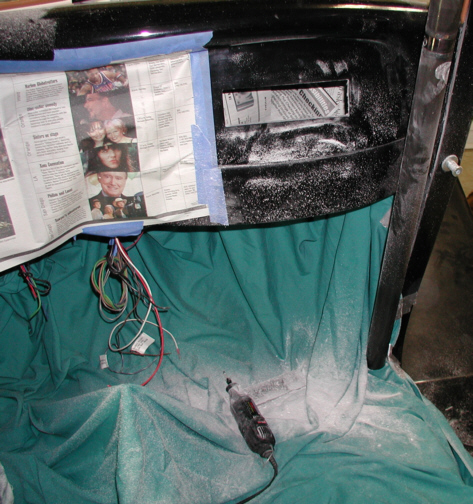
I thought about the location for the
radio and decided on the right side of the dash. My other spot would
have been under the gages right over the center console but I didn't
think it would look right there because of how wide the console is compared
to the radio size. I used a sheet and covered the carpet and masked off the
gages, steering column and under the dash to keep the fiberglass dust to
a minimum. Once I had things covered, I marked the location and then
used my Dremel to cut out a hole. If you ever have to cut
fiberglass with a Dremel, you don't have to drill a pilot hole, you just
plunge the carbide bit right through and away you go.
|
|
|
I wanted the unit to be centered vertically
and have the same distance between the gages and right side of the
dash. The Alpine unit has 12 wires that needed to be hooked up and
I put them all on two plugs. If I were using an amp, I would have had
much more wires to connect, but as you can see by all the wires hanging
down, I have a lot of things to hook-up still. Wiring takes time and is
kind of boring so I won't be posting much as I work on it. If you look
close, you can see an aluminum trim piece around the brake peddle that I
had to fit once the carpet was down. I also had to cut-down a
piece that I made sometime ago that goes between the steering column and
floor. I'm get'n close now so stay on board as I wrap-up the interior
and take it for another test drive.
|
|

|
| 3/05/05
If you notice in above picture, there are a lot of
wires hanging down and now it's time to do something about them as they
all go into the console. I'm going to have a total of eight switches to
control everything but the headlights....kinda. What I mean by
"kinda" is that the headlight switch that has been in the car
for sometime now is the kind that pulls out in two steps. The first
notch is for the parking lights which also turns on the dash lights and
the second notch puts power to the headlights. It also has a dimmer if
you turn the knob just like a modern car has but if you notice there is
no high-low beam switch on the floor. This is where the
"kinda" comes in because I'm going to have the high-low beam
switch in the console. I'll talk about all the other switches in a
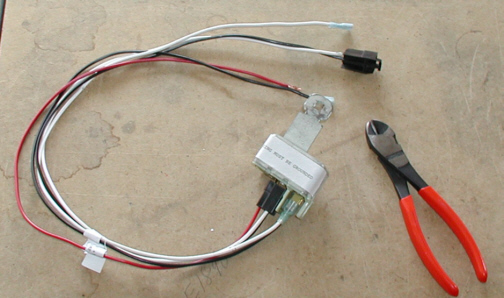
minute but now let's get to the picture below which is a relay for my
power windows. The power windows came with switches but they were the
older kind and they didn't match what I wanted so in order to have my
windows work properly, I had to buy two of these reverse-acting relays,
one for each window. These will take the place of the way the other
switches work that came with my power windows but it's not an actual
switch. The end with the black plug which has a white and black wire
(which is an exact match to what came with my switches....now how did
that happen) is what goes to the window motor. To open the window, power
is sent down the black wire and to close the window, power is sent down
the white wire. Simple enough and you may be thinking why do I need all
this when a SPDT (single pole - double throw) switch could do that? Well
it's like this, when the power is going down one of the two wires, the
other is acting as a ground which is why a normal SPDT switch won't work
so this is where the double-acting relay comes in. This unit reverse's
the polarity of current without me worrying about it and now I can use a
switch that is "normally closed" with "momentary-on"
for controlling the windows. I cut the wires with the black plug on it
so I could use the plug-end on the motor and ran wires between them. All
the wires behind the console received plugs for a clean install.
|
|
|
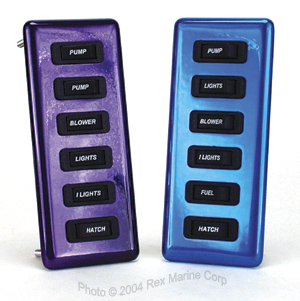
The switch panel that will be going
near the top of the console has six rocker switches in it that I bought
from
Rex Marine but
will be polished instead of anodized which they offer as well. You can
buy the switches with names on them or without and I got them without
names because the names that I wanted they didn't have. Rex Marine
offers two types of switches for there panels which are SPST (single
pole, single throw) and momentary-on, off, momentary-on. They didn't
have any SPDP switches which is what I needed for my power windows so I
had to look elsewhere for that one. After looking at how the panel was
made, I thought about sending it back and just making it my self but I
decided to keep it and make one that held two switches to put at the
bottom of the console. The reason for making the other panel is because
Rex Marine doesn't make one that holds just two switches. This panel is
2 1/2" wide X 5.9" tall X 1/4" thick aluminum with an
1/8" radius that goes around the entire panel. They get held in
place by four 10-32 set-screws that are blind-tapped and come with
washers and nuts that are all stainless.
|
|
|
|
1 2
3 4
5 6
7 8
9 10
11 12
13 14 15
16 17
18 19
20 21 22 23
24 25
26 27
28 |
|
29
30
31 32
33 34
35 36
37 38 39 40
41 42
43 44
45 46
47 48
49 50
51 52 53 |
|
54
55
56 57
58 59
60 61
62 63
64 65
66 67
68 |
|