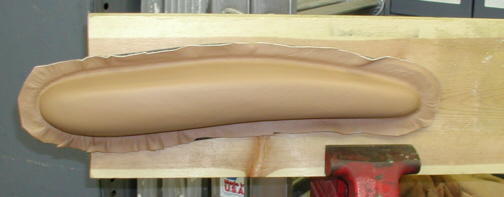
This is my arm-rest that was harder to
cover than I thought. Now this was the second try that you see below.
What I did on my first try was to just put the material on and start
pulling it around, pressing and forming as I went. It ended up having a wrinkle
in it when I was almost finished which didn't look good at all so off it
came. This time I used the outside flat edge to fasten it to a piece of
wood that was held in a vise. Why did I do this? It was like having a
third person helping my wife and I. What we ended up doing was both of
us grab a side and stretch both away and apart from each other. When I say
we stretched the material, I mean I didn't know that we could make the
material that big. At this point, we placed it over the middle of the
armrest and then while she held her end in the stretched position, I
pushed and molded it in place on the left end. After we had that side
looking good, we slowly worked are way to the other side. By overhanging
the end with the larger radius, we were able to work on it a little
easier which let us wrap the material around the sides. This was the key
(stretching) to getting it to look right. Live and learn.
|
|
|
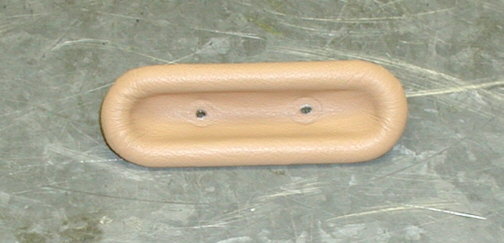
I trimmed the excess material from
around the outside right up to the transition between the flat and round
surfaces. The reason for this was if there were any material on the flat
surface, this would hold the arm-rest away from the back of the door
panel not allowing it to come through as far. Now it's time to work on
the finger-pulls.
|
|

|
I used the same "stretch" technique
to do the finger-pulls but this time I just had my wife stretch the
material and I used my fingers to mold it in place. After getting the
center to look nice, I then pushed and pulled the material around the
corners. To finish the back, I trimmed the material to within 1/4"
of the sides and then glued it to the back. They didn't come out too bad
for a rookie.
|
|
|
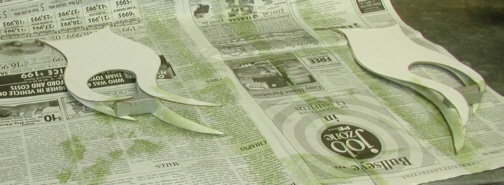
Remember I said that I was going to
add one more thing to the door panel next to the speakers? Well this is what
I had in mind....flames! I glued two pieces of cardboard together to
make some flames that will be raised when the material is on. I have no experience
when it comes to making "flames" so I hope they look good when
I'm done.
|
|
|
|
1 2
3 4
5 6
7 8
9 10
11 12
13 14 15
16 17
18 19
20 21 22 23
24 25
26 27
28 |
|
29
30
31 32
33 34
35 36
37 38 39 40
41 42
43 44
45 46
47 48
49 50
51 52 53 |
|
54
55
56 57
58 59
60 61
62 63
64 65
66 67
68 |