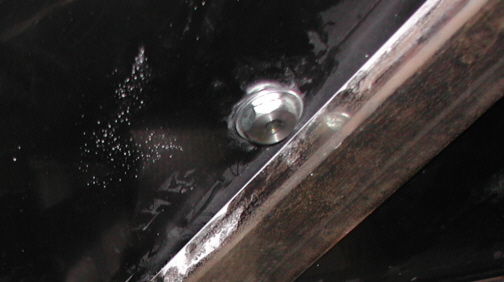
Here is the reason that I used the
longer tracks. As you can see, even with the longer distance between the
two studs, it almost interferes with the X-member. The shorter one would
have put the hole right in the middle of this (near the bottom of the
picture).
|
|
|
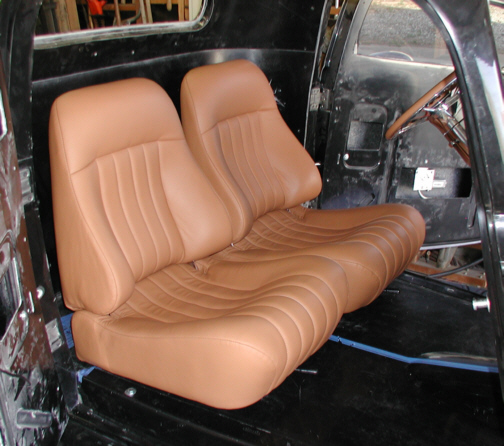
This is what they look like installed.
I removed the bubble-wrap to take the picture and then put it back on
right after so they would stay nice. After tightening the nuts down, the
seats wouldn't slide. I tried loosening and tightening the nuts in
different combinations but nothing worked. By having two nuts loose on
one side of either seat, that would allow it to slide so I thought the
tracks needed some shims. I put a straight edge on the floor and found
that it had a belly in it (high in the middle) so shims should do the
trick. I used a few washers on the outside track but that didn't work
either after trying different amounts on each stud. At this point, I
removed the seat and looked at the tracks for any problems but didn't
find any. The tracks moved up and down just fine while on the seat only so I
removed the tracks from the seat and installed them on the floor. Well
they worked just fine without the seat so what could it be?
Turns out the tracks were binding after being tightened. I looked at the
ends of the tracks while they were tightened down and noticed that one side
seemed to be higher than the other (the sliding parts). I loosened the two outside nuts so
the seats would slide and then slid the seat all the back to access the
tracks better. I then used a pry-bar and bent the tracks a little and
tried them again and it helped so this meant that I was on the right track
(no pun intended). I did the same thing to the other end and that did
the trick. It took hours to find out that all I had to do the whole time
was bend the tracks a slight amount. Funny how things work out
sometimes!! After I had the tracks working when the nuts were tight, I
then removed all the nuts and made them into lock-nuts by squeezing them in a
vise which made them slightly out-of-round in the threaded area. When I reinstalled them, they went on hard
and shouldn't rattle
themselves loose. In a couple more weeks, I'll be trying my hand at some
upholstery.....which I've never done before.
|
|
|
| 7/10/04
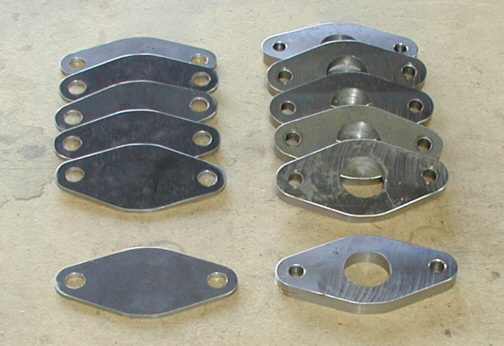
I'm going to revisit the rollcage again and what
you see below are some pieces that I made and it's how I'm going to fasten
the tubing to my chassis. The pieces on the right are 3/8" thick
mild steel which will get welded to the top of the chassis. The two
smaller holes are 5/16" diameter which is the tap-drill size for a
3/8-16 bolt. After they get welded to the chassis, I'll then use the
hole as a guide and drill the chassis the same size. Then I can run a
3/8 tap down through the holes which will hold the thinner plates on.
The larger hole is for two reasons. The first is too lighten the pieces,
and the second is to be able to tack welding them in place. The thinner pieces on the left which are
1/8" thick mild steel will then get bolted to the top of the other
plates and will have the rollcage tubing welded to them. This way I can remove
the cage when I want or need too. This method of fastening the rollcage
to the chassis is acceptable and should pass the NHRA tech inspection
according to the rule book.
|
|
|
I slid the seat all the way forward to
gain some working space and then laid out the spots for my new pieces. I
had placed some tape on the floor some time ago just for this purpose.
The numbers are how far from the back wall the tubes will be so I can
get both sides the same. This section of floor with the red lines will have to be removed
so let's make some holes.
|
|

|
|
1 2
3 4
5 6
7 8
9 10
11 12
13 14 15
16 17
18 19
20 21 22 23
24 25
26 27
28 |
|
29
30
31 32
33 34
35 36
37 38 39 40
41 42
43 44
45 46
47 48
49 50
51 52 53 |
|
54
55
56 57
58 59
60 61
62 63
64 65
66 67
68 |