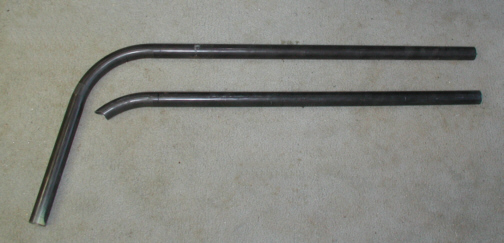
What you see here are the bars that
will run from the roof hoop down to the floor. The rule book states
"all cage structures must be designed in an attempt to protect the
driver from any angle, 360 degrees". This also gives the cage
strength as it ties in the roof hoop to the floor. There's not much left of
the radius once I've cut the tube to length. I'll have to grind the
bottom to match the angle that it will be at once it's installed to the
floor.
|
|
|
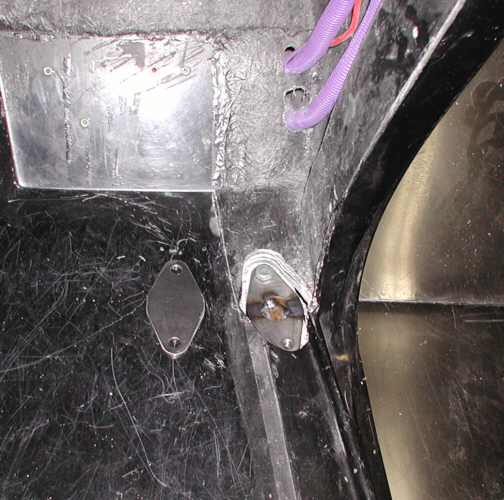
The procedure for attaching the bottom
of the tube will be the same as the main hoop was which means I'll
tack-weld the 3/8" plate to the chassis through the 1" hole.
The one thing that's different here is that instead of tapping two
3/8-16 holes per side, I'm only going to be doing one. Well there's good news and
bad news with this. The good news is that one of the body mounting holes
was in just the right place so I'm going to use that hole for one of the
bolts to fasten too. The bad news is that I'll have to create another
place to hold down the body later on. The bolt that you see in the plate
is where the body use to mount. I think I'll move the body mounting bolt
forward about two inches. This means that I can drill a 5/16" hole
through both body and chassis for now but I'll have to wait till the
body is off to finish it. I'll then have to make some kind of a
thread-insert and weld it to the chassis so the bolt will have threads
because the chassis is only 1/8" thick.
When the chassis was being made, TCI uses nuts that are welded to the
bottom of the frame rail with a clearance hole for the bolt to pass
through. I'm not going be able to do that so this is where the threaded-insert thing comes in. Once the body is off, I can then use a
3/8" drill and open the floor of the body up so the 3/8" bolt
will pass though it. Yeah it's a lot of extra work but I'm use to
it now.
|
|
|
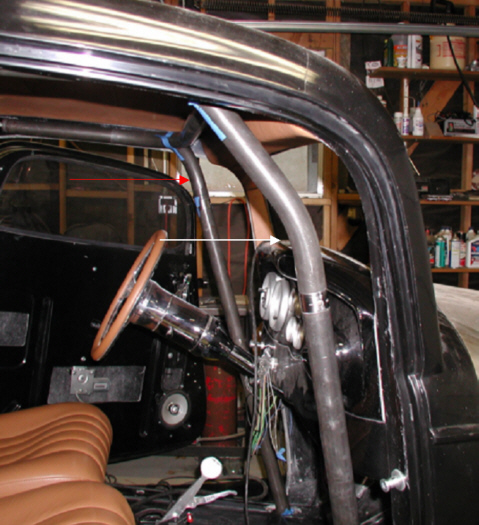
After cutting and grinding the tubes
so they would fit, I didn't like the way they looked. I should have cut
the tubes off farther from the radius than I did which now means the
gap between the dash and tubing is a little too much for me. What I need to do
is start over and leave more of a straight
section on the tube which would put the radius down farther into the car
closer to the "A" pillar and hug the dash better too. Now if
you remember when I was doing the down-bars, I was going to use some
that were bent but found out that I could use straight ones instead.
Well that meant that I had leftover pieces to use so I dug
out one of the bent tubes and held it up to see how it looked. This is
what I needed and the bend was just about the same as the ones I had just
cut so this meant it would work. Again, good news here but there's also
bad news....figures huh! I only had one bent tube because I cut the
other one experimenting with where to cut the other tubes earlier so I
wouldn't make a wrong cut. That means that I'll have to make another
trip over to the guy that bends the tubing one more time. If you look at
the drivers side (red arrow) you'll notice that the radius of the bend
is much higher than the other one. The passenger side (white arrow) is
where I want the radius of the bend to end up at which places the tube
closer to the dash. You can also see the couplers are in different
places from one tube to the other. I wanted them to be as close to the
roof hoop as I could (drivers side) which meant that the tubes would be
as short as possible but they will have to be a little longer as you can see.
The reason I wanted them shorter is so it's easier to get in and out of
the car but it's not like I'm going to be removing it every week so it's
not a big deal.
|
|
|
I went over and had two pieces bent
just in case things didn't go as planned. I ended up using only one to
do the drives side and it came out just like the passenger side. Now the two
sides match and I'm happier with it. Once all the welds were done and it
was time for reassembly, things went together much harder than when
everything was tack-welded. The heat from the welding makes things just
a little longer not allowing them to line up like I had before. I'm glad I don't have to take this apart
very many more times because it's a pain.
|
|

|
|
1 2
3 4
5 6
7 8
9 10
11 12
13 14 15
16 17
18 19
20 21 22 23
24 25
26 27
28 |
|
29
30
31 32
33 34
35 36
37 38 39 40
41 42
43 44
45 46
47 48
49 50
51 52 53 |
|
54
55
56 57
58 59
60 61
62 63
64 65
66 67
68 |