33 Coupe Interior 38
1103/04
What I have here are the pieces for my
roll-cage. I bought 1 5/8" diameter X .083 wall 4130 Chromemoly tubing. I
could have went with .134 wall mild steel but the CM is much lighter and
much stronger but more expensive. I loaded my car on Gary's trailer and
went over to a friend of his to have it bent like I wanted and then all
I would have to do is cut, fit and weld it all together. The pieces
consisted of a main hoop, two down bars (the ones that attach to the
main hoop and go into the trunk area), two door bars (these go between
the main hoop and the floor at the front of the door), a roof hoop (this goes all the way around
the roof area and attaches to the main hoop), two A pillar pieces (one
end attaches to the floor and the other to the roof hoop) and shoulder
bar (goes behind the seats and attaches to the main hoop which the seat
belts will attach too). The shoulder bar is smaller in diameter at 1
1/4" which is also Chromemoly. When the cage is done, it should meat
the NHRA rule book.
|
|

|
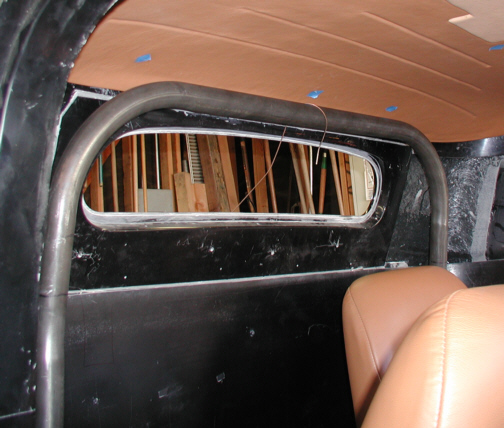
The first piece to get installed was the main
hoop. This is a very important piece of the rollcage puzzle and has to
fit right or nothing else fits well. I put my headliner in so I could
tell how much needed to be cut from the bottom of the hoop because I
added about an inch to this piece when we made it. The headliner is
about 3/8" thick and I wanted the main hoop to be within an inch of
it. Getting the headliner in was a major pain because of all the clips
that it has. Now you can't see any of the holes that the clips need to
go into so you have to move the headliner around at one end till you
have one of the clips enter a hole. Then you go for the clip that's next
to that one and pop it in place till you have them all in. I put a small
piece of blue tape on each clips location so I could tell where they all
were while working with it. I
ended up taking the headliner out three times to straighten out some of
the clips that got bent as I was trying to install it. You don't know
that the clips are bent till you notice the spot that you just
tried to put in is sticking out which makes the leather bulge out too.
Once I had it in place, I could then cut and weld in the main hoop.
Notice the piece of welding rod bent into a hook shape to keep the hoop
in place while I worked and measured. This rod is attached to a clamp
which is clamped to the body where the deck lid goes. You have to come up with things
like this when you work alone. I also used rope that went around the top
and inside the car and through the door openings to help me install the headliner which was like a
third hand and worked great. Once I had the length I wanted, I marked
and cut the main hoop and was now ready to weld the bottom 1/8"
plates on.
|
|
|
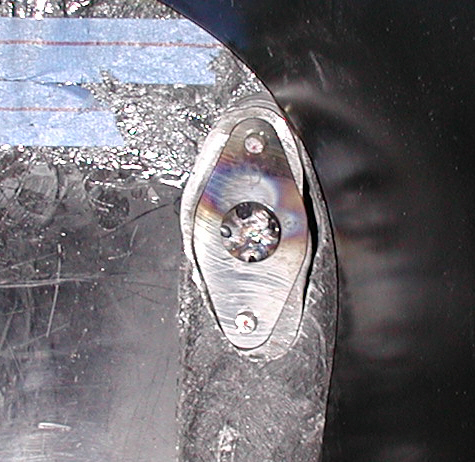
Before I could weld the plates on, I
had to first have the threaded plates welded in. These plates are
3/8" thick and have a 1" diameter hole in the middle so I
could tack weld them in place. The one inch hole was originally for lightening
which is why I put them in when I made them but worked out for tacking
them in place. Once I had them tacked in place, I needed to tap all the 3/8-16
threaded holes. The plates had the tap-drill size already drilled so all
I needed to do was drill through the frame and use the tap-drilled hole
as a guide. Once the holes were drilled, I tapped the threaded holes all
the way through the plate and frame. Now I could fit the main hoop and
the 1/8" thick plates that will bolt to these bottom pieces. Now
the reason I'm using the bolt-in design is because I want to be able to
take out the cage if need be. If the hole cage was welded in, I wouldn't
be able to install the headliner or rear pieces of the interior and I
would be able to take the body off so this
is why I did it. To
find the spot that the 1/8" plates needed to be, I bolted them to
the 3/8" pieces and marked the main hoop and plate in two places with a felt
marker on each side. Now all I needed to do was match the lines up again and tack
them on.
|
|
|
To weld the plates on, I used my old
bike straps to help hold the hoop in place. I placed the straps over
some joists and adjusted them like I wanted and tacked them in place.
After tacking them on, I then put the hoop back in the car to make sure
that everything still lined up. Once I was sure everything was where it
should be, I welded them in place. Time to do the down bars that go into
the trunk.
|
|

|
|
1 2
3 4
5 6
7 8
9 10
11 12
13 14 15
16 17
18 19
20 21 22 23
24 25
26 27
28 |
|
29
30
31 32
33 34
35 36
37 38 39 40
41 42
43 44
45 46
47 48
49 50
51 52 53 |
|
54
55
56 57
58 59
60 61
62 63
64 65
66 67
68 |
|