33 Coupe Paint 18
9/30/05
| While I'm waiting for Bart to finish working
on more body panels, I thought I would keep busy and install my front
and rear glass. Installing glass on this car isn't that bad because it
doesn't have any molding that goes around either window. I've helped with
the installation of glass before but it's been a long time so I called
on my good friend Paul to help me out. Paul is the one that
helped me
with my carpet awhile ago and is Bart's older brother. Paul use to do
auto glass along time ago but is now installing glass on buildings as of
today. I
had the window in the car for my test drive which was held in with duct tape and it seemed
then that it was going to be easy to install when the time came. The
time has come so lets get started.
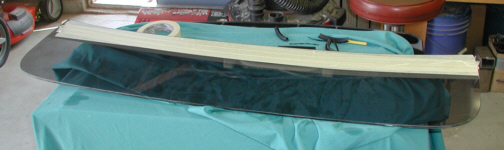
Paul brought over the needed supplies to install
the glass after looking at it the day before, like sealant and the rubber
molding that goes around it. The first thing he did was cut four small pieces of
rubber molding about 2" long from the 12 foot long piece. These small pieces
were used to trial fit the window before we put the sealant on. If
anything didn't fit, now was the time to do something about it and not
after the sealant was applied. Sure enough, the front glass didn't have
enough clearance around it so the rubber molding would fit right. To fix the
problem, we needed to sand about 1/8" off the bottom side along
with the same amount from the right side of the glass.
|
|
|
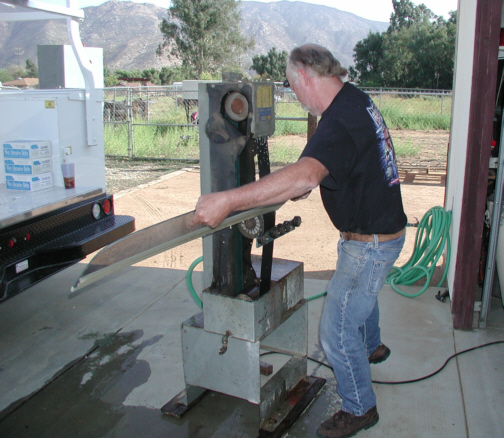
| To handle the sanding duties, we went
back over to Paul's house and brought back his glass sander. This sander
is really a large belt sander with a couple of features that a normal
sander doesn't have. In place of a flat area to rest your work, this one
has a set of "rollers" on it. These rollers are so you can set
your glass on them and "roll", not drag your glass across
them. You don't want to be dragging glass across anything ya know. One
other thing that it has is a place to hookup water. The water does two
things: One, it keeps the glass nice and cool: Two, it keeps the dust
down to a minimum. When we were through sanding and the sander was loaded
back into his truck, all the water had dried and all that was left was
some white stuff on the ground. This was the sand (silica) that makes up
the glass which just sweeps up when your finished.
I've never
seen anyone actually sand glass before (like leaning over someone's shoulder)
so I learned something that day.
Paul put three rows of masking tape on both sides of the glass and
started sanding. The tape was doing two things. The first was to give
him a line to work to which was 1/8" from the edge, the needed
amount of glass to be removed. The second thing was so the glass didn't get any
scratches in it. I figured that it would take awhile to remove 1/8"
of material but it doesn't. After about three pass's across the belt, he
was finished. By using water to keep the glass cool, I was amazed how
fast the glass cut. After cutting the window to size, Paul held it at an angle to
bevel the edges of both sides and it was time to see how it fit.
|
|
|
| We cut the rubber into two pieces
because of the right-angles on the bottom of the window. To make the
rubber look better, Paul mitered the ends to a 45 degree angle where
they came together. Speaking of cutting, this rubber is shaped like the
letter "T" but has little pieces sticking out from both sides
of the longer leg. These little pieces (two rows on each side) had to be
taken off so I put one end in the vise and used a razor blade to remove
them. This process took awhile because the last thing I wanted to
do was cut too much off or cut too deep.
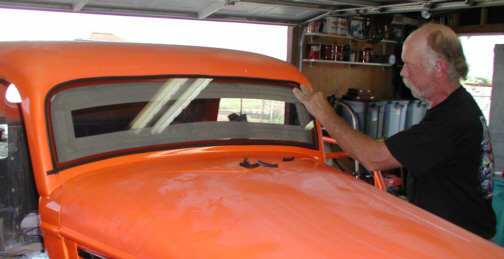
Now that everything fits good, it's time to remove
it all and break out the sealant to make it permanent. Notice the small
rubber pieces on the cowl. These are the pieces that were used to trial
fit the window in the beginning.
|
|
|
| After a few words from Paul on what to
do and not to do, he was ready to put a bead of sealant in the window
channel. Now once you have the sealant in place, there's no turning back
so everything had to be right. Paul uses Sikaflex 220+ made by Sika for sealant and told me
that this stuff is "nasty" to work with. I've used silicone
many times before and thought this would be similar, but I couldn't have
been more wrong. This sealant was by far the worst stuff I've ever
worked with. I know now why Paul used masking tape on my dash before he
applied the sealant. It was for easier cleanup after we were done.
Speaking of cleanup, we used lacquer thinner to wipe things off with but
that only smears the sealant around. You end up wiping and wiping to get
the smallest amount off which takes more time than you can believe. To
be effective, you need to turn your rag or paper towel to a spot that
hasn't been used before to have it work at all. And to get it off your skin,
it's almost funny how much you can chase it around as you try to get
clean. Everyone should experience this stuff at least once to appreciate
it.
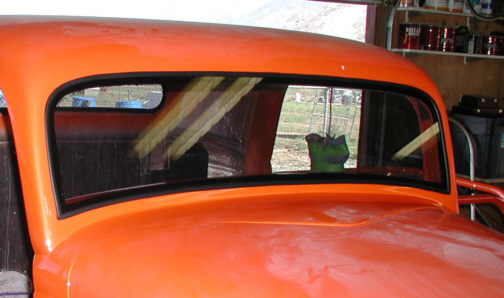
While the sealant was drying, Paul placed a piece
of tape on each side of the rubber along the top radius to keep it held
down. I removed the tape the next day and the rubber stayed in place.
The end result turned out real nice. The corners look great as you can
hardly see the miter joints now that everything is dry. I learned a lot
from Paul today about installing glass because there's a lot more to it
than it looks.
|
|
|
|
1
2 3
4 5
6 7
8 9
10 11
12 13
14 15
16 17
18 19
20 21
22 23
24 25
26 27
28 29
|
|
30
31 32
33 34
35
|
|