33 Coupe Paint 32
11/23/05
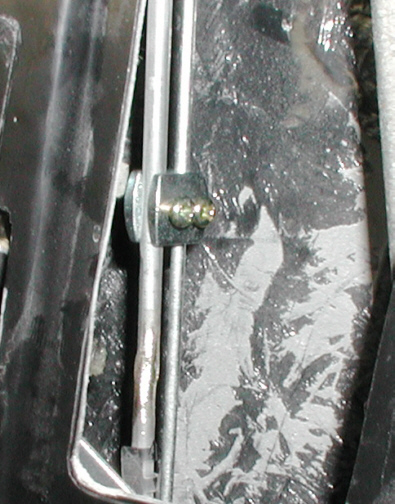
What I needed was a different way to
attach my solenoid rod now that the solenoid was at this new angle. Here is
how the two pieces of linkage are held together. This small clamp came
with my keyless entry system and joins the solenoid and door latch rods
together. The smaller rod is coming from the solenoid which pushes
upward, releasing the door latch and then after about one second, it
pulls in back down. With the new location of my solenoid, the two rods
are binding against each other just enough so the latch won't
open.
|
|
|
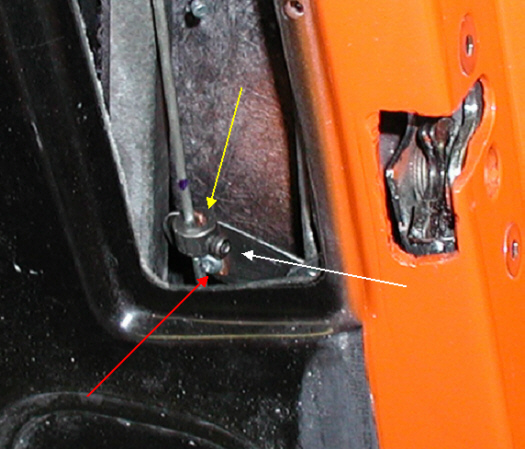
| I was running out of ideas at this point so it was
time to dig deep and make this work before I went crazy. What I needed
to do was attach the rod that comes from the solenoid to the new arm
independent of each other so after a trip to the hardware store, I found part of what I thought
would work (I hope). I used an electrical lug that is made at a right
angle (yellow arrow) and attached it to the new arm with a small screw
that was double-nutted in place (red arrow). The reason for the double
nut was so this piece could move slightly as the solenoid was being activated.
My new right angle piece is made out of copper which would have been
easy to make but at this point, I used it because I was getting tired of
messing with this whole door latch thing.
The round piece that you see below with a socket
head cap screw sticking out of it (white arrow) is 1/2" diameter
mild steel that I made real quick to see if this was all going to work
or not. I drilled a 3/16" diameter hole through the center of it
and then drilled and tapped a 6-32 thread in the side too clamp the rod
and copper piece together. Notice the door latch rod (to the right)
which is just visible. I mounted that rod in it's original location on
the latch (when I first received the body, this is where it attached) with a cotter pin. I drilled
a small hole through the rod (the rod is bent at a right angle at the
bottom and then goes through the hole) and used a washer and cotter pin to hold it in place.
The hole
that the rod is in now use to be one of the two screw holes that held
the new arm in place. By using the cotter pin on one hole and
leaving the bolt on the other hole, the new arm should stay put and work
fine.
After hooking everything back up to try my new pieces out, it finally
worked!! I didn't need the rod coming from the solenoid
to be as long now so I cut it where you see the blue mark. I installed
the door panel just to make sure everything still worked and it did.
Well after about eight to ten hours of extra work, I was back in
business. Now it's time to start working on installing my running boards
and rear fenders. Boy am I glad that's done with....
|
|
|
| 12/05
Oooohh.....Chrome!
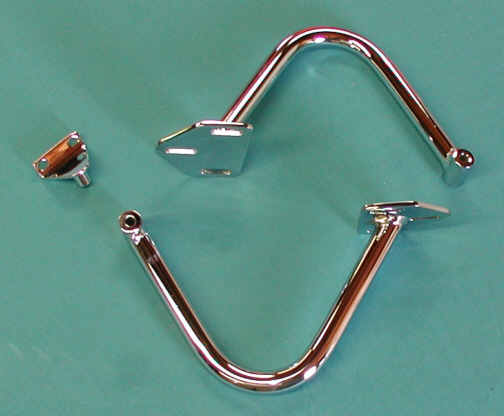
Now that the doors open and close properly, it's
time to start putting the trunk back together. What I have below are my
deck lid hinges and latch striker that I took to the chrome shop. The
hinges came with the car and are made out of steel, but they were
starting to rust after two plus years with nothing on them, so what
better way to make them look better than to treat them too a little corrosion
preventative. The striker (which mates with the latch assembly on the
trunk floor) is also made out of steel (which is a custom piece that I made
awhile back) was in the box of items to get chromed too. I had a company
called MJB Plating in Rialto, Ca. do the plating and I'm pretty happy
with the results. I do have to say though, I'm still in "sticker shock"
on how much it costs to do chrome plate these days. I guess I'm still
use too the prices that were back in the days of my last car that I
built.
There is one nice thing about having chrome in place of polished
aluminum, and that's the low maintenance involved to keep it looking
good. It takes just minutes to wipe chrome off but not for aluminum,
that's a whole different ball game. A quick wipe with some Windex and
the chrome is ready to go.
|
|
|
Here is what it looks like with the
trunk all put back together. I had my paint guy smooth out the welds on
my gas tank so it wouldn't look so rough. I like the way welds look when
they're painted but in this case, I wanted a smoother look in this area. I
also installed some black weather stripping made by
Soffseal
around the edges to keep water out and so the deck lid wouldn't rattle.
The way that Redneck Street Rods built the water channel around the
trunk opening really doesn't require any rubber around it. The reason
for this is because this area is "U" shaped all the way around it and if
water was in there, it would just run down to the bottom and then out
between the deck lid and the body. It's really a very good design and
more people should make them like this, so "props" go out to Redneck
Street Rods for that one.
|
|

|
|
1
2 3
4 5
6 7
8 9
10 11
12 13
14 15
16 17
18 19
20 21
22 23
24 25
26 27
28 29
|
|
30
31 32
33 34
35
|
|