33 Coupe Last Details 26
6/13/04
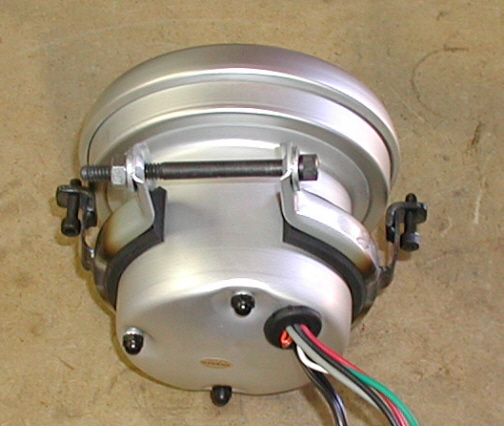
What I did was weld some small
"L" shaped brackets to the ring that goes around the body and
then tapped some 10-32 screws in them to act like the mounting system
that the rest of them have. I also added a longer bolt in place of the
"two-bolt" mounting that came with it. By tightening the ring
first in about the position that you see below, I can then tighten the
two socket head cap screws against the back of the dash to keep it in
place. It's not pretty, but it worked great.
|
|
|
After running the line for the water
temp gage, that had to go all the way to the front of the engine, the
line wasn't long enough. I wanted the line to be hidden as much as possible
and to be able to do that, I needed another way of routing it or a
longer line. Well the longer line was out of the question because this
was a mechanical gage and not an electrical one. That means that the
line that comes with it is all you get because it has a pyrometer on the
end that you can't lengthen. If it were an electrical gage then no
problem because all you would have to do is add as much wire as you
needed. On the other hand, a mechanical gage is more accurate which is why I went with
them. What I needed was a shorter route for the line to take so I
drilled a hole in the firewall right next to my fuel regulator large
enough for the pyrometer to fit through. This made it almost a straight
shot for the line to take towards the front of the intake manifold which
is where it was before (temporarily installed for starting the engine).
I choose this location for the hole because it won't be that noticeable
as it will be under some plug wires and next to my fuel regulator. I now
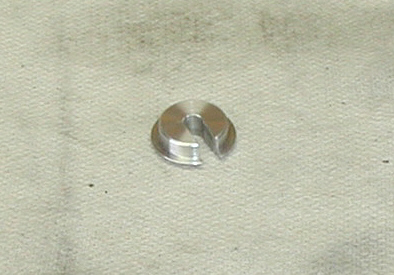
had a very large hole so I made a plug to cover it out of aluminum. The
slot that you see will show so I made sure that it was oriented towards
the bottom
when it was pressed in. That slot had to be there to be able to slide
over the line and then inserted into the hole but will be filled with
clear sealant from the inside to prevent any fumes from coming through.
I might make a two-piece one later so I won't have to have that slot to
look at.
|
|
|
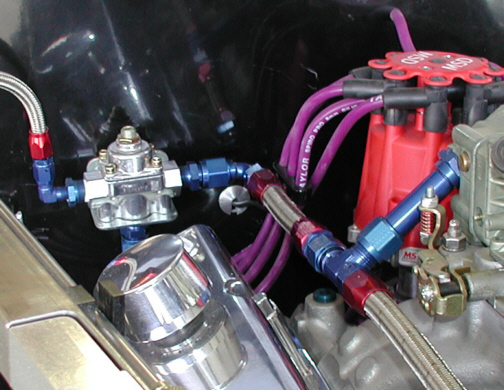
Here you can see the new plug from the
engine side. If you were looking from the top down, you would hardly see
it at all. It doesn't look to bad but I think I'll make another style
real soon.
|
|
|
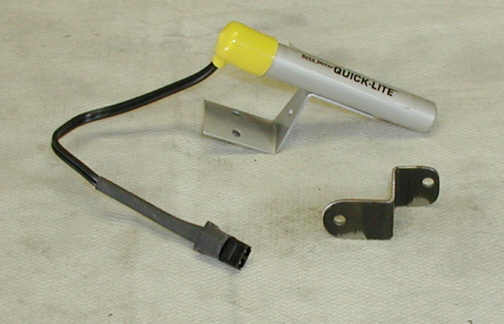
This is the shift-light that came with
my tachometer. Originally this was fastened to the side of the tach by
the attached bracket but being that it's not mounted to
the steering column or some place out in the open, I needed a new
placement for it. I planned to mount it in the dash between the speedo
and tach. By using one of the existing holes on the shift-light bracket,
I was able to make an "S" shaped bracket of my own and fasten
it to one of the hold-down screws on my speedometer and the other side of it went
to the existing hole on the shift-light. For those that don't know what
a shift-light is for, let me enlighten you (no pun intended). When your
wanting to shift the gears manually, it's nice to be able to watch the
road instead of your gages so a shift-light comes on at a pre-selected
RPM that you set it at. When you reach that RPM, the light goes on and
you then shift the transmission. It's easier and safer to use one of
these because you use your peripheral vision in place of looking down at
your gage. Now these lights come in two different sizes and I have the
smaller one which is 5/8" diameter. The other one is 1 1/4"
and is brighter. Most newer ones like this one use an LED in place of a normal light
bulb because they emit much more light.
|
|
|
|
1 2
3 4
5 6
7 8
9 10
11 12
13 14
15 16
17 18
19 20
21
22
23 24
25 26
27 28 |
|
29 30 31
32 33
34 35 |
|